Wednesday 6 October 2021

SOME HEALTH BENEFITS OF EATING GUAVA

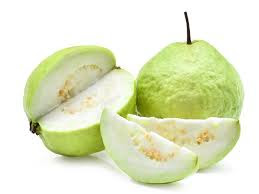
Guava is a nutrient-dense fruit that grows in dry or humid heat. Guava contains more Vitamin C than Oranges, as well as other antioxidants, and has been demonstrated to offer a variety of health advantages. Just a handful of advantages of eating Guava are listed below. 

GUAVA IMPROVE DIGESTION

Fiber is one of the most important elements of Guava. By hardening and softening stool, fiber has been found to aid digestion. this can help with both diarrhea and constipation signs and symptoms.

GUAVA RELIEVE PAINFUL MENSTRUAL PERIODS

The degree of menstrual cramps can range from minor to terrible cases. Women who suffer from unpleasant cramps might try the guava leaf. The extract of Guava leaf was found to be more helpful than painkillers in treating menstrual cramps in one investigation.

GUAVA PREVENTS DIABETES

Guava has a low glycemic index, which means it won't spike your blood sugar. furthermore, the high fiber content helps to keep blood sugar level in check when eaten.

Current  Agric
Guava

Friday 13 August 2021

SOME OF THE CURRENT CAUSE OF FOOD SCARCITY

It will interest you to know that before now, food supply has been in surplus owning to the conducive atmosphere by humans and their activities towards the sustainable economic growth, the life style of the people, particularly the African continent.

But only recently due to the emergence of uncontrollable insecurities, banditry, cattle rustling, land grabbing, forceful taking of the people’s indigenous land by the government as well as bad influence in the government which are enemies of the people, lack or hijacking of farm implement, tools, fertilizer and so on.

Farmers can no longer conveniently or guarantee going to their farms anymore without the fear of been kill, molested, rape or their farm produce taking away from them. This ugly trend has caused serious effect on the shortage of food supply which has also in turn affected other area of life such as economic, finance, employment, as well as education, to mention a few. Children can no longer concentrate on their studies when they are hungry and worried about where to get the next meal. The solution is to initiate a project to provide people with lasting solutions to this problem.

Food shortage and scarcity

Monday 24 February 2020

3 SIMPLE WAYS TO EARN MONEY FROM YOUR FARM


Converting Your Farm into a Campsite
Usually, if you live close or stay around an urban area where people are always looking out for their next great outdoor vacation.
Ways to earn money from your farm
Campsite
To convert your farm into a campsite, you'll need to put in place a simple shower and toilet unit for your campers. Most campsites are basic and don't provide electrical outlets while others have installed electricity for the campers to use. If the farm is near a tourist area, this is definitely one avenue to put into consideration. Make sure the area you choose for the campsite should also be level and free from stagnant water; ensure safe erection of campers’ tents. You can start small and put any profits from the camp into improving the facilities of your campsite. By reinvesting your profits you will be creating a sustainable business.

Snails Farming for Profit
Snail farming has been around for many years now. In most developing nations around the world, Snail is becoming an important exported animal.
Ways to earn money from your farm
Snail farming
In order to farm snails, you'll need to provide them with shelter, plants, and food. Depending on your farm area. Some farmers use outdoor pens which are open, others prefer the use of netting to keep them in.
Before investing in structures to keep them, start small and develop a market for them. If you notice the demand growing, expand by increasing the available housing for them.

Rental Space for Meetings or Gatherings
If you have a large farm consider renting it for a range of gatherings, such as business meetings, Birthday ceremonies, Wedding ceremonies, classrooms, or an exercise facility etc. Advertise in local newspapers, radio or on supermarket bulletin boards in your area.
Ways to earn money from your farm
Rental space
The truth is that there are always people looking for areas for meetings. This could earn you money during the day, as well as evenings and weekends. In most cases parking availability is always a bonus for some.

Wednesday 19 February 2020

ORIGIN OF FARMING

The origin of farming and agriculture began with early men they consist of men, women and their children. They survive through wandering i.e. moving from place to place in search of food. Through wandering they were able to gather food to eat by uprooting tubers, plucking of fruit and nut. They hunted animals and collected wide fruits. They caught fishes in the streams and rivers they came in contact with.

HOW SETTLEMENT GATHERING AND DOMESTICATION STARTED
As time went on, the early men observe that the seed previously thrown away after eaten germinated, grew into trees and began to bear fruits. As wanders without shelter, an idea of settlement came into them. Instead of becoming a wanderer, they erect tents and return back to their shelter with what so ever they have gathered. They observed that seeds thrown away after eating their flesh grew up. They began to throw seeds around their tents and environment. The seeds germinated, grew up and were cared for by the early men, especially the women and their children. The young animals that were captured alive were not killed but were kept and cared for till when needed. From there, early men engaged in gardening, and domestication of selected crops and domestic animals. They also fish in the stream and rivers.
 
farming
Farming

Tuesday 12 November 2019

PRE-PLANTING OPERATIONS

These are the operations carried out in the farm before sowing. They include;
  • Choosing of site
  • Clearing
  • Stumping
  • Plotting
  • Tillage practices
  • Ploughing
  • Harrowing
  • Ridging
Choice of site
The choice of a farm site is a part of the activities before planting. This is guarded by;

The nature of the land (Topography): This is, whether the land is hilly or level. A fairly level land should be chosen to reduce the cost of the land preparation and erosion control problem.

The type of soil: This should be considered in the choice of farm site or location. This is because soil is the medium for plants growth and poor soil will produce poor yield.

Availability of inputs such as labour and planting materials: The workers to be employed that will work in the farm must be available in the area where the farm is to be located. Crop planting materials should also be available. The ease of transporting farm produce and sale also guard the choice of a farm site.

Clearing of site
The farm site is cleared by means of hand tools such as the cutlass or mechanical equipment such as bulldozer. The equipment used depends on the vegetation in the area. In the rain forest belt, cutlass may be required for brushing the under growth while axe, motor saw or chain saw and cutlass are used to fell the trees. The trees are chopped into pieces. On large scale, bulldozer may be used to remove forest vegetation. Burning can be carried out on cut undergrowth and plants, especially in the rain forest area. This helps to add ash which contains lime and potassium which make the soil alkaline. Alkalinity of the soil leads to increase in nitrification process. The remains of burnt plants are packed and re-burnt. The larger trunks are left to decay in case of small holdings, but bulldozers may be used to push them off in the case of mechanized farming.

Stumping
This is the removal of plant stumps and roots from the soil. It is a tedious operation. The practice is usually avoided in small scale private farms. Where crop rotation system is practiced, stumping is done. 

Plotting or laying out
The act of dividing the farm land into sections is called plotting or laying out. This is usually based on the report of soil survey. Soil survey shows the nature of the land (Topography), Soil types, and nutrient status. Soil and water conservation methods to be used on the land. It also shows where to locate the various farm steads. Plotting can be done by using the 3-4-5 method.

How to use the 3-4-5 metric method in farm plotting: Erect a pole at about the Centre of the farmland. From the pole A, take a base line AB 4m long with a string tied to the pole. Tie another string, 3m long, to the pole at A and extend to C. A third string 5m long is also tied to pole B and is extended to meet pole C thereby forming a triangle with a right angle at A. Arrange poles along the line AB to the end of the farm. The same is done to the side line AC. Ensure that you sight them to give straight lines. The length and breadth of the farm so measured will make it easy to divide the land into plots. Paths are used to demarcate the land into blocks.

Tillage practices
Land tillage is the operation that follows after the land area has been cleared, stumped, and plotted. Tillage involves the opening up of the soil for seed planting. This could be done by means of simple farm implements such as hoe in a small scale farm. Mechanical devices such as the tractor and its coupled implements like ploughs, harrows or ridgers could be used in tilling the land. This is used mostly under large scale farming. The purpose of tillage is the same whether hand tools or mechanical equipment are used.

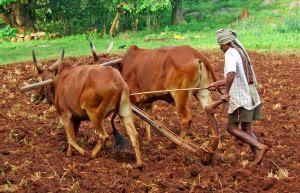
Ploughing: This involves the tillage or turning of the soil upside down. It can be done with a hoe, a spade or a tractor driven disc plough in the tropical regions or mouldboard plough used mostly in the temperate regions. Animals could be used to drag the plough during tilling. It is usually the first equipment to be use on cleared farmland. The plough cuts and inverts large lumps of soil. Weed seeds are then buried below cultivated seeds. The disc plough is more suitable for use in heavy, sticky and dry tropical soils than the mouldboard plough.

Harrowing: The harrow is the next equipment used after the land has been ploughed. It is used to further breakdown the large lumps of soil cut by the plough into smaller pieces. This is called pulverization of soil. The disc harrows are more suitable for use in tropical environment. After harrowing it may be possible to grow crops such as rice which do not required seed beds or ridges for other crops such as yam, tomato and groundnut after harrowing. This will necessitate the next operation which is ridging.

Ridging: This is the last stage in land preparation for planting of seeds or seedlings. It can be done by means of Indian hoes or tractor driven disc ridger or mouldboard ridger. Animals could be used to drag ridger for ridge making. Ridging is done normally across the slope of the land to prevent it from being washed away by erosion. It is spaced 1m apart. This is measured from the top or crest of one ridger to the other. The length of the ridger depends on the availability of land and choice of the farmer. A standard ridger should be 25m long. It has a conically shaped top or crest or triangular shape. The trench between two ridges is called furrow. Tie-ridges can be constructed at intervals between two ridges. Ridging increases the depth of surface soil for better crop growth. 
Farm with operations in progress

Monday 4 November 2019

COMPUTER AIDED FARM RECORDS

This is the record of all the activities of the farm electronically by using the computer. Computer literacy is the subject of intense debate today. As typically phrased, the issue revolves around the instruction needed to allow current and future decision-makers to effectively utilize the computer technology. Our limited experience with microcomputer use in farm management gives several reasons for the optimistic belief that this technology can be an aid to effective farm decision making.  In many of these instances, the input of farm management researchers and educators could be of valuable assistance.

How to record farm activities with the computer
  • Manual process: This involves documenting the farmer records by using pen and paper to serve as a guide in entering the data into the computer.

  • Collation of records: This is the next step after the manual process. The information, data and records of the farm are brought together for easy entering into the computer.

  • Input of records: The farm records are typed into the computer. Any application may be used in as much as it is suitable. Application such as excel can be very used.

  • Storing of records: The already typed data is then stored into the computer memory or an external device for easy access. The record should be stored in a way that it can be easily accessed.

Friday 1 November 2019

MAINTENANCE OF SIMPLE FARM TOOLS

The following maintenance practices or precautions are to be adopted to prolong the life span and effective use of farm tools

  • Tools should be washed or cleaned after use.
  • Oil, grease or lubricate movable parts to reduce friction.
  • Sharpen tools with blunt edges or blades regularly .e.g. cutlass
  • Paint, oil or grease metallic parts to prevent rusting if they are to be kept for a long time
  • Store tools in a cool dry place.
  • Replace worn-out or damaged parts of farm tools.
  • Check and tighten loose nuts and bolts daily or periodically.
  • Remove tools with wooden parts away from the sun to avoid cracking.
  • Keep metallic tools away from rain or moist places to avoid rusting.
  • Keep tools with wooden handles away from termites and fire.
  • Handle tools with care and use them for the right farm operations.
Simple Farm Tools

Wednesday 30 October 2019

ORIGIN OF FARMING/AGRICULTURE IN NIGERIA

The origin of farming and agriculture began with the early men they consist of men, women and their children. They survive through wandering i.e; moving from place to place in search of food. Through wandering they were able to gather food to eat by uprooting tubers, plucking of fruit and nut. They hunted animals and collected wide fruits. They caught fishes in the streams and rivers any time they come them.

HOW SETTLEMENT GATHERING AND DOMESTICATION STARTED

As time goes on, the early men observe that the seed previously thrown away germinated, grew into trees and began to bear fruits. As wanders without shelter, an idea of settlement came into them. Instead of becoming a wanderer, they erect tents and return back to their shelter with what so ever they have gathered. They observed that seeds thrown away after eating their flesh grew up again. They began to throw seeds around their tents and environment. The seed germinated, grew up and were cared for by the early men, especially the women and the children. The young animals that were captured alive were not killed but were kept and cared for till when needed. From there, early men engaged in gardening, and domestication of selected crops and domestic animals. They also fish in the stream and rivers as well.

MODERN AGRICULTURE

     The modern agriculture today, began with the ancient people. It has passed through several modernized changes ranging from farming methods (such as shifting cultivation, bush fallowing, pastoral farming etc.), tools used in farming and kinds of farming input. As population begin to increase, knowledge keep improving by the day, civilization set in, which gives lives to new innovation in farming. This has replace bows, arrows, and spear with simple farm tools. Also, exchange of products with products (trade by barter) has changed to buying with money.

          Furthermore, with increasing population it has resulted to high demand in food item and non-food items on the same available land. Knowledge has brought about another higher step in improvement and development in agriculture. The growth and diversification in industry and the role of science and technology has improved and developed agriculture generally and better. Commercial farming came into existence since subsistence farming can no longer meet up man demand. The role of science and technology has brought tremendous changes in agriculture as it has touched every area of agriculture in Nigeria today and in the world at large. The use of farm machines, irrigation system, chemical, fertilizers, livestock feeds, livestock drugs, processing and storage facilities, resistance variety and high yielding crop and animal species have provided answer to many problems facing man, food, materials needs and agriculture. Improve farming method has led to high production of food crops, cash crops, and animals in a large quantity for the survival of man and in industries. The abundant production of raw materials from agriculture enhance our export, resulting to growth in commodity trade and increase in forage exchange, it has also brought about diversification of our local industries potentials and have provided employment opportunity to Nigerians.


Monday 28 October 2019

FACTORS AFFECTING FARM ANIMALS DISTRIBUTION IN NIGERIA

Factors affecting farm animals distribution in Nigeria includes;

  •     Presence of grass land
  •     Religious belief
  •     Infestation of pests and diseases
  •     Humidity

(i)           Presence of grass land: The availability of grassland will attract the rearing of farm animals. That is why the Northern Nigeria with vast savanna grassland is conducive for the rearing of large population of grazing livestock.

(ii)         Religious belief: Due to religious reasons, rearing of pigs is forbidden in some of the Northern part of Nigeria. Reason being that Muslims see the rearing and consumption of pigs as a taboo.

(iii)       Infestation of pests and diseases: Areas that are highly infested with pests and diseases that attack farm animals cannot have large population of livestock.Because of this, the Southern Nigeria cannot rear large number of livestock due to the presence of Tsetse fly which transmit trypanosomiasis (sleeping sickness) to cattle.

(iv)       Humidity: Livestock disease and pests do well in areas with high relative humidity but cannot survive in low humidity or dry areas. Southern Nigeria with high humidity promotes  the presence of disease which attack and kill animals. On the other hand, Northern Nigeria with low humidity and dry environment reduces the presence of livestock diseases and pest. Thus, the environment favours the rearing and production of livestock.

Friday 25 October 2019

CLASSES OF FARM ANIMALS

Farm animals are classified based on the following: Size, Habitat, Mammals, Non-mammal and their types of stomach.

Classification based on size: Farm animals are grouped into two. Large farm animals and small farm animals.

Large farm animals: Large farm animals are large in size, bigger and stronger than other farm animals. They can be used to perform specific work in the farm, such as helping to till the farm, transporting farmers and their farm yields. Large farm animals like castrated bulls, horses, camels and donkeys are very useful to farmers and agriculture generally. Milk, meat, bones, horns, hides and skin comes from this group of farm animals. These items are good raw materials; Examples are donkey, cattle, horse, goat, sheep, camel, pig etc.


Small farm animals: These groups of farm animals are small in size and are useful also. Eggs, honey, fish, snail and chicken types of meat are gotten from small farm animals. The body coverage of small farm animals varies. Poultry is covered with feathers, fish with scales, and snail with shell, grass-cutters and bees with hairs. Examples are fish, snail, grass-cutter, rabbit, poultry (chicken, duck, turkey, guinea fowl, geese, pigeon, and parrot), honey bees etc.

Classification based on habitat: Farm animals are classified into two categories of habitat. They are aquatic and terrestrial farm animals.

Aquatic farm animals: These are farm animals that live in water. They are cold blood because they live throughout their life span in water. Examples are fish, crabs, crayfish, prawn, shrimps, lobster etc.


Terrestrial farm animals: Terrestrial refers to land. Thus, terrestrial animals are farm animals that live on land. Examples are sheep, goats, cattle, horses, poultry, pigs, snails, honeybees etc. Most farm animals live on land. Their bodies are covered with hair, feather, shell and they are warm blooded. Land animals are divided into two, mammals and Non-mammals.

Classification based on mammal and Non-mammal farm animals and their type of stomachs.

(i)           Mammal farm animals: These are farm animals that give birth to their young one alive and feed them with milk from their udder breast. Their bodies are covered with hairs and they are warm-blooded. Examples are goat, sheep, pig etc.

(ii)          Non mammal farm animals: They are farm animals that give birth to their young ones through egg-laying. Their bodies are covered with shells, scales and feathers. They are both warm and cold-blooded. Examples are poultry, fish, snail etc. Mammal and non-mammal farm animals are further divided into two ruminants and non-ruminants based on their types of stomach.

Friday 8 November 2013

THE WORKINGS, NATURE AND PARTS OF THE MODERN MILLING MACHINE FOR ENGINEERING PURPOSES

Milling machines are very versatile in nature. They are usually used to machine flat surfaces, but can also produce irregular surfaces. They can also be used to drill, bore, cut gears, and produce slots. The type of milling machine most commonly found in student shops is a vertical spindle machine with a swiveling head. A milling machine removes metal by rotating a multi-toothed cutter that is fed into the moving work piece. The spindle can be fed up and down with a quill feed lever on the head. The bed can also by feed in the x, y, and z axes manually. Once an axis is located at a desired position and will no longer be fed, it should be locked into position with the Gibb locks.

Most milling machines are equipped with power feed for one or more axes. Power feed is smoother than manual feed and, therefore, can produce a better surface finish. Power feed also reduces operator fatigue on long cuts. On some machines, the power feed is controlled by a forward reverse lever and a speed control knob.

Trimming the head

The head of a vertical milling machine can be tilted from side to side and from front to back. This allows for versatility of the machine, but these adjustments can drift. Occasionally, one should check and adjust the head so that the spindle will be normal to the plane of the table. 

Install a dial indicator into the spindle so that the dial is offset at least six inches from the axis of the spindle and the indicator probe is facing down. Lower the spindle until the dial indicator contacts the table then registers about one half of a revolution. Set the dial indicator is toward you and set the bezel to zero. Rotate the spindle by hand 180 degrees. If the dial indicator still reads zero, the spindle is aligned front to back. If not, adjust the head until the dial reads half of the original reading and iterate the entire process until the error falls within acceptable limits. Repeat the process with the dial displaced left and right to alight the head side to side.

Squaring of the vise

Work on a milling machine is most often held in a vise clamped onto the bed. To make features aligned with the edges of the stock, it's necessary to align the vise with the feed axes of the mill. To do this, mount the vise on the bed and secure it with T-bolts, but only lightly so as to permit adjustment of the orientation of the vise. Mount a dial indicator in the spindle of the machine with the probe facing away from you. Lower the spindle and run the bed of the table back until the fixed jaw of the vise is in contact with the indicator and further until the indicator registers one half of a revolution. Set the bezel to zero. Use the cross feed to run the indicator across the face of the vise. If the vise is squared, the inductor will remain at zero. If the dial indicator does not read zero, tap lightly with a soft hammer to realign the vise reduce the indicator reading to half of its previous value. Iterate this procedure until the dial indicator reads zero through the full travel across the face of the vise. Tighten down the T-bolts be careful not to change the vise orientation. Recheck the alignment of the vise.

Different types of milling cutters

In vertical mills, milling cutters with solid shafts are usually used. Milling cutters with keyed holes are predominantly for use in horizontal mills. End mills are designed for cutting slots, key ways and pockets. Two fluted end mills can be used to plunge into work like a drill. End mills with more than two flutes should not be plunged into the work as well. Ball end mills can produce a fillet. Formed milling cutters can be used to produce a variety of features including round edges.

Removing and installation of milling cutters

To remove a tool, move the quill to the highest position and lock it in place. Then, engage the brake while loosening the draw bar with a wrench. Ensure that the draw bar's threads are still engaged in the collets. Tap on the end of the draw bar to release the collets from the spindle. If the threads of the draw bar are not engaged, the milling cutter will fall, and could be damaged. Finally, unscrew the drawbar from the collets.

To install a tool, place the desired milling cutter in collets that fits the shank of the cutter. Insert the collets into the spindle. Ensure that the key way on the collets mates properly with the key in the spindle. While holding the tool with one hand, start the threads of the draw bar into the collets by hand. Use a wrench to tighten the drawbar down with one hand while holding the brake.

Climb verses conventional milling

During milling, one should be aware of the difference between conventional, and climb milling. In conventional milling, the work piece is fed into the rotation of the cutter. This type of cut requires lower forces and is preferred for roughing cuts. In climb milling, the work moves with the rotation of the cutter. This produces a better finish. It is not recommended if the work piece cannot be held securely or cannot support high forces.

Calculating speeds and feeds during milling

Cutting speed refers to the speed at which the tool point of the cutter moves with respect to the work measured in feet per minute. Feed is the rate at which the work moves into the cutter measured in feed per tooth revolution. Feeds and speeds affect the time to finish a cut, tool life, finish of the machined surface and power required of the machine.

The cutting speed is mostly determined by the material to be cut and the material of the tool. To find the right speed for any task, refer to the Machinery's Handbook or other reference. To calculate the proper spindle speed, divide the desired cutting speed by the circumference of the tool expressed in feet. The feed rate depends on the width and depth of cut, finish desired and many other variables. To calculate the desired feed setting from the feed rate, multiply feed per tooth per revolution by number of teeth and rpm of the spindle.

Setting of the spindle speed

The setting of the spindle speed is varied by changing the geometry of the drive train. On many modern machines, it can be adjusted continuously with a hand crank. The spindle must be turning to make the adjustment. A dial indicator reads the speed in rpm.

Using an edge finder

Before doing precise work on a milling machine, you must be sure to locate the edges of a part accurately. An edge finder is designed to help you do this. An edge finder is composed of two concentric cylinders, spring loaded together. To use it, offset the two halves slightly so that there is a wobble as it spins. Then, move the part into the tool slowly. The edge finder will center up, and then break out of concentricity suddenly. At that point, reset the dial indicator or digital readout for that axis of the machine to a value equal the radius of the edge finder. Repeat the process at least once.

Using the micrometer dials

Most milling machine manual feeds are equipped with dial indicators. If you know how far you want to feed the bed, you can set the dial indicator to that number (in thousandths of an inch). Just turn the locking ring counterclockwise to free the dial indicator, set the dial, and lock in the setting. Be certain that the backlash in the mechanism driving the table is taken up prior to setting the dial indicator.

Squaring Stock

To create a square corner on a part, first orient an already finished edge vertically in the vise and clamp lightly onto the part. Set a machinist's square against the finished edge and the bottom of the vise. Lightly tap the part with a plastic hammer to align it with the square. Clamp the vise down securely. Now the top edge of the part is ready to be milled to horizontal.

Face milling

In face milling, it is often necessary to create a flat face on a large part. This can be done best with a facing cutter. Select a cutter about one inch wider than the work piece so that the facing can be accomplished in one pass.

SOME HEALTH BENEFITS OF EATING GUAVA

Guava is a nutrient-dense fruit that grows in dry or humid heat. Guava contains more Vitamin C than Oranges, as well as other antioxidants, ...